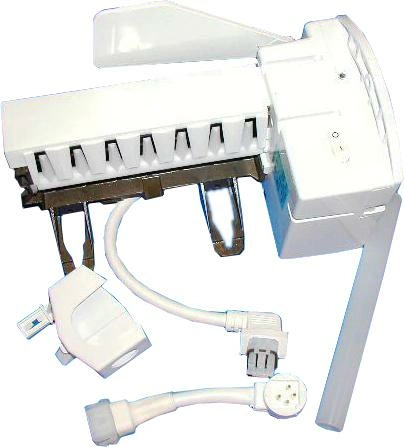
WR30X10093 GE Refrigerator Ice Maker

WR30X10093 is an original equipment manufactured (OEM) part. Maintain your kitchen with this high-quality ice maker designed to enhance your GE refrigerator's performance. This reliable component, crafted by GE, ensures a steady supply of ice, perfect for entertaining or cooling down your favorite beverages. Compatible with various brands, including Hotpoint, Haier, Monogram, and Café, it provides versatility for your appliance needs.
Easy to install and designed for optimal efficiency, this ice maker integrates seamlessly into your existing setup. Enjoy the convenience of fresh, perfectly shaped ice whenever you need it. Whether you're preparing for a family gathering or simply need ice for everyday use, this part is essential for any modern kitchen. Enhance your refrigerator's capabilities with this dependable ice maker today.
Weight : 3.12 lbs
Package Dimension : 11.50 x 5.80 x 6.50
Product Details
Reviews 3
Replaces Parts
Installation Instructions
Compatible Models
Compatible Brands
WR30X10093 is an original equipment manufactured (OEM) part. Maintain your kitchen with this high-quality ice maker designed to enhance your GE refrigerator's performance. This reliable component, crafted by GE, ensures a steady supply of ice, perfect for entertaining or cooling down your favorite beverages. Compatible with various brands, including Hotpoint, Haier, Monogram, and Café, it provides versatility for your appliance needs.
Easy to install and designed for optimal efficiency, this ice maker integrates seamlessly into your existing setup. Enjoy the convenience of fresh, perfectly shaped ice whenever you need it. Whether you're preparing for a family gathering or simply need ice for everyday use, this part is essential for any modern kitchen. Enhance your refrigerator's capabilities with this dependable ice maker today.
Weight : 3.12 lbs
Package Dimension : 11.50 x 5.80 x 6.50
Please Verify Your Purchase to Submit a Review
How to Replace the WR30X10093 GE Ice Maker
Replacing a damaged or malfunctioning WR30X10093 GE Ice Maker is a relatively easy job that most homeowners can complete in less than an hour. To ensure your new ice maker is installed safely and performs optimally, follow the instructions outlined below.
Tools and Materials Needed:
• Phillips screwdriver
• WR30X10093 GE Ice Maker Replacement
Instructions:
Step 1: Disconnect Power Supply – Before attempting any repairs or replacements, it is important to disconnect the power supply to the ice maker. Locate and remove the screws securing the front panel of the refrigerator, and then turn off the power switch located on the wall of the appliance.
Step 2: Disconnect Water Line – Once the power is off, you will need to disconnect the water line from the old ice maker. Use the adjustable wrench to loosen the fitting, then pull the line free from the appliance.
Step 3: Remove Ice Maker – Next, it's time to remove the existing ice maker. Begin by removing the old connection harness from the back of the unit, and then unscrew the four screws that secure the ice maker to the refrigerator wall. Lift the ice maker up and out of the refrigerator.
Step 4: Install Replacement Ice Maker – Now, you can start installing the replacement WR30X10093 GE Ice Maker. Again, start by connecting the harness to the back of the unit and then slide the new ice maker into place. Secure it using the four screws that were removed earlier.
Step 5: Reconnect Water Line – Once the new unit is secured, you will need to reconnect the water line. Using the adjustable wrench, tighten the fitting until it's securely in place.
Step 6: Plug-in Power Supply – Finally, plug in the power supply and replace the front panel of the refrigerator. Your new WR30X10093 GE Ice Maker Replacement is now ready for use.
Please keep in mind, these instructions are for general guidance and should always be used in conjunction with the manufacturer's manual, if available.


