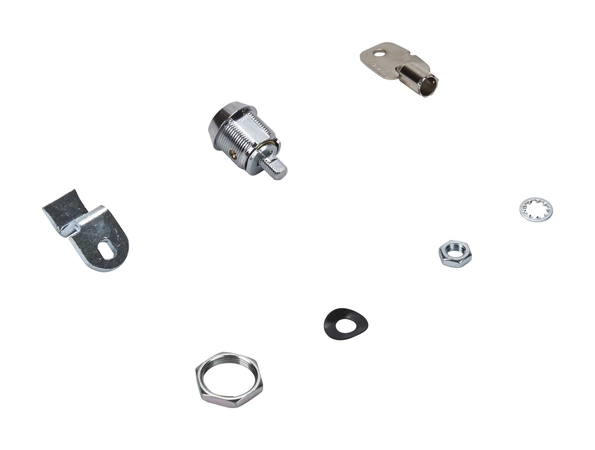
W11315637 Whirlpool Lock Assembly

This Commercial Laundry Appliance Meter Case Lock and Key Assembly includes the lock for the meter case, and the key that you turn to lock and unlock the meter case. This part can be used across several brands; check to see if your model number is compatible. This assembly kit includes the key and the mounting bracket. Installing this accessory will require basic hand tools and novice repair experience. Be sure to unplug the dryer and washer or shut off the house circuit breaker for the appliances before installing this kit. Also make sure you turn off your hot and cold water supplies to the washing machine.
Part Specification
• This product is a Factory Certified Accessory. These three words represent quality parts and accessories designed specifically for your appliance. Time tested engineering that meets our strict quality specifications
• Package contains (1) Commercial Laundry Appliance Meter Case Lock and Key Assembly
• Tools Needed: Multi screwdriver
Weight : 0.04 lbs
Package Dimension : 3.00 x 1.50 x 1.00
Product Details
Reviews
Replaces Parts
Installation Instructions
Compatible Models
Compatible Brands
This Commercial Laundry Appliance Meter Case Lock and Key Assembly includes the lock for the meter case, and the key that you turn to lock and unlock the meter case. This part can be used across several brands; check to see if your model number is compatible. This assembly kit includes the key and the mounting bracket. Installing this accessory will require basic hand tools and novice repair experience. Be sure to unplug the dryer and washer or shut off the house circuit breaker for the appliances before installing this kit. Also make sure you turn off your hot and cold water supplies to the washing machine.
Part Specification
• This product is a Factory Certified Accessory. These three words represent quality parts and accessories designed specifically for your appliance. Time tested engineering that meets our strict quality specifications
• Package contains (1) Commercial Laundry Appliance Meter Case Lock and Key Assembly
• Tools Needed: Multi screwdriver
Part Specification
• This product is a Factory Certified Accessory. These three words represent quality parts and accessories designed specifically for your appliance. Time tested engineering that meets our strict quality specifications
• Package contains (1) Commercial Laundry Appliance Meter Case Lock and Key Assembly
• Tools Needed: Multi screwdriver
Weight : 0.04 lbs
Package Dimension : 3.00 x 1.50 x 1.00
Please Verify Your Purchase to Submit a Review
The following parts are replaced by this product
- 8316526
- 4396668
DIY Instructions for Replacing a Whirlpool W11315637 LOCK-CAM
Replacing a broken or damaged Whirlpool W11315637 lock-cam can be done in the comfort of your own home with the help of this handy DIY guide. Here’s what you’ll need to get started:
1. Phillips head screwdriver
2. Flathead screwdriver
3. New Whirlpool W11315637 lock-cam
4. Utility knife (optional)
Step 1: Unplug your appliance and remove the screws that secure the control panel to the washer.
Step 2: Using the Phillips head screwdriver, unscrew the screws that hold the lock-cam in place.
Step 3: Carefully remove the old lock-cam and set aside.
Step 4: Insert the new lock-cam into the washer, making sure that the locking tab is facing the right direction (towards the rear of the machine).
Step 5: Secure the new lock-cam in place using the Phillips head screwdriver. You may need to use a flathead screwdriver to make sure that the lock-cam is properly seated.
Step 6: Use a utility knife to remove any excess plastic from the area around the locking tab (optional).
Step 7: Re-secure the control panel to the washer by replacing the original screws.
Step 8: Plug the appliance back in and test the new lock-cam.
That’s it! With just a few simple steps, you can replace a worn out or broken Whirlpool W11315637 lock-cam.
Please keep in mind, these instructions are for general guidance and should always be used in conjunction with the manufacturer's manual, if available.


