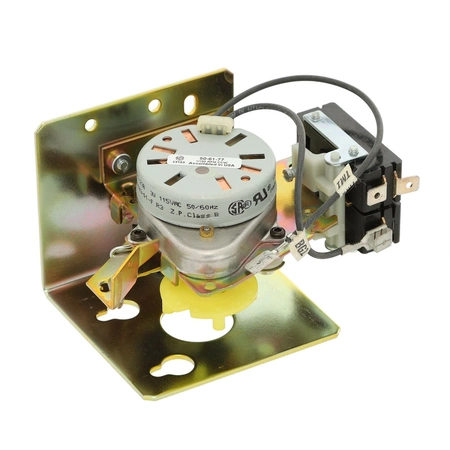
W11451464 Whirlpool Dryer Timer

Optimize your laundry routine with this high-quality circuit board timer designed for various dryer models. Compatible with brands including Admiral, Amana, Jenn-Air, Kenmore, Kitchenaid, Magic Chef, Maytag, Norge, Roper, and Whirlpool, this timer ensures precise control for efficient drying cycles. Made by Whirlpool, it meets stringent quality standards, guaranteeing reliability and performance.
This essential part helps maintain the functionality of your dryer, preventing malfunctions and extending the lifespan of your appliance. Easy to install, it offers a straightforward solution for restoring your dryer’s performance. Keep your laundry running smoothly with this durable, dependable timer, making every drying session a breeze. Order now to Maintain your drying experience!
Weight : 1.19 lbs
Package Dimension : 6.42 x 5.71 x 4.53
Product Details
Reviews
Replaces Parts
Installation Instructions
Compatible Models
Compatible Brands
Optimize your laundry routine with this high-quality circuit board timer designed for various dryer models. Compatible with brands including Admiral, Amana, Jenn-Air, Kenmore, Kitchenaid, Magic Chef, Maytag, Norge, Roper, and Whirlpool, this timer ensures precise control for efficient drying cycles. Made by Whirlpool, it meets stringent quality standards, guaranteeing reliability and performance.
This essential part helps maintain the functionality of your dryer, preventing malfunctions and extending the lifespan of your appliance. Easy to install, it offers a straightforward solution for restoring your dryer’s performance. Keep your laundry running smoothly with this durable, dependable timer, making every drying session a breeze. Order now to Maintain your drying experience!
Weight : 1.19 lbs
Package Dimension : 6.42 x 5.71 x 4.53
Please Verify Your Purchase to Submit a Review
The following parts are replaced by this product
- W10045440
- WPW10045440
- W11120478
DIY Guide for Replacing the Whirlpool W11451464 TIMER
Tools Needed:
• Phillips screwdriver
• Flathead screwdriver
• New Whirlpool timer
Step 1: Unplug your appliance from the power source. It’s critical that you turn off the power to the appliance before beginning any repair work.
Step 2: Remove the rear panel of the appliance, which can be done by unscrewing the screws with a Phillips or flathead screwdriver.
Step 3: Once you have removed the back panel, locate the timer and identify the wires connected to it. Make sure to note which wire connects where.
Step 4: Disconnect the wires from the timer gently. This can be done by pressing down on the release tab and pulling off the connectors.
Step 5: Remove the screws that hold the timer in place and remove it.
Step 6: Place the new timer in position and secure it with the screws you had earlier removed.
Step 7: Connect the connectors for the wiring, ensuring that they are securely attached.
Step 8: Replace the back panel on the appliance, securing it with the screws.
Step 9: Recheck all wiring connections, making sure everything is connected properly.
Step 10: Plug the appliance into the power source and test that the timer functions properly.
You have now successfully replaced the Whirlpool W11451464 TIMER.
Please keep in mind, these instructions are for general guidance and should always be used in conjunction with the manufacturer's manual, if available.


