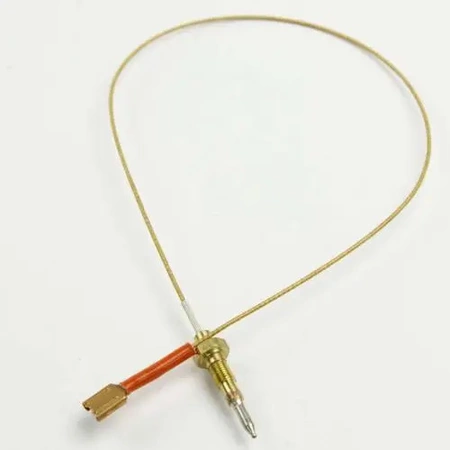
508025 Bertazzoni MM300 Thermocouple
Part #: BER 508025
508025 Bertazzoni Thermocouple MM300
Weight : 0.13 lbs
Package Dimension : 4.49 x 3.62 x 1.10
508025 Bertazzoni Thermocouple MM300
Weight : 0.13 lbs
Package Dimension : 4.49 x 3.62 x 1.10
Please Verify Your Purchase to Submit a Review
Please note: We use this information only to confirm your purchase, it won’t be published.
How to Replace a 508025 Bertazzoni Range Thermocouple MM300
Replacing the thermocouple on your 508025 Bertazzoni range can help ensure that your oven is working properly and that it is operating at the correct temperature. Replacing your thermocouple is a relatively simple do-it-yourself (DIY) project, but it does require some basic tools. To replace the thermocouple, you will need a flathead screwdriver, needle nose pliers, adjustable wrench, and a replacement thermocouple.
Step 1: Unplug the appliance and shut off the gas supply line.
Before beginning any repair to your appliance, always make sure to unplug the appliance and turn off the gas supply. This ensures your safety while you are working on the appliance.
Step 2: Locate the thermocouple.
The thermocouple is the small piece of metal that connects the control valve to the gas line. It is located near the gas valve and the burner assembly.
Step 3: Disconnect the thermocouple from the gas line.
Using needle nose pliers, carefully remove the thermocouple from the gas line.
Step 4: Remove the screws holding the thermocouple in place.
Using a flathead screwdriver, remove the screws that hold the thermocouple in place.
Step 5: Install the new thermocouple.
Insert the new thermocouple into the hole where the old thermocouple was. Make sure the wires are facing the correct direction. Secure the new thermocouple with the screws removed in step 4.
Step 6: Connect the thermocouple to the gas line.
Using adjustable wrench, connect the thermocouple to the gas line. Use caution when tightening the connection. Make sure that the connection is secure and leak free.
Step 7: Test the thermocouple.
Turn on the gas line and test the thermocouple by turning the control valve to the “on†position. If the gas flow is steady, the thermocouple has been installed correctly.
Now that your thermocouple has been successfully replaced, you can make sure your 508025 Bertazzoni range is functioning properly. Always make sure to follow all safety precautions when working on any appliance and/or gas line.
Please keep in mind, these instructions are for general guidance and should always be used in conjunction with the manufacturer's manual, if available.
No more associated models for this part.


