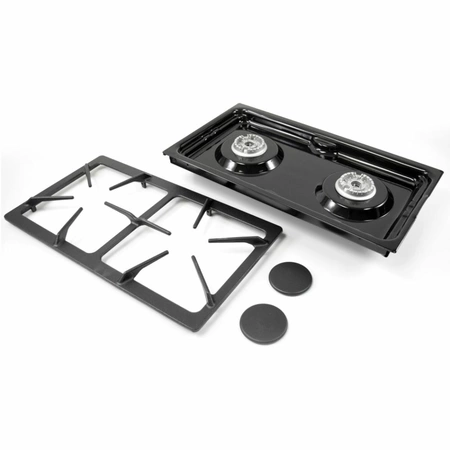
JGA8150ADBA Whirlpool Burner Module Cartridge

Whirlpool Maytag Jenn-Air Range Cook Top Black Gas Sealed Burner Cartridge JGA8150ADB
● One-Piece Porcelain-On-Cast Iron Burner Grates.
● Two Sealed Burners.
We are a Factory Authorized Parts Distributor for Whirlpool Maytag Jenn-Air. Trust us for all of your Whirlpool Maytag Jenn-Air appliance parts and accessories needs.
● One-Piece Porcelain-On-Cast Iron Burner Grates.
● Two Sealed Burners.
We are a Factory Authorized Parts Distributor for Whirlpool Maytag Jenn-Air. Trust us for all of your Whirlpool Maytag Jenn-Air appliance parts and accessories needs.
Weight : 11.01 lbs
Dimension : 24.75 x 11.00 x 5.62
Product Details
Reviews
Replaces Parts
Installation Instructions
Compatible Models
Compatible Brands
Whirlpool Maytag Jenn-Air Range Cook Top Black Gas Sealed Burner Cartridge JGA8150ADB
● One-Piece Porcelain-On-Cast Iron Burner Grates.
● Two Sealed Burners.
We are a Factory Authorized Parts Distributor for Whirlpool Maytag Jenn-Air. Trust us for all of your Whirlpool Maytag Jenn-Air appliance parts and accessories needs.
● One-Piece Porcelain-On-Cast Iron Burner Grates.
● Two Sealed Burners.
We are a Factory Authorized Parts Distributor for Whirlpool Maytag Jenn-Air. Trust us for all of your Whirlpool Maytag Jenn-Air appliance parts and accessories needs.
Weight : 11.01 lbs
Dimension : 24.75 x 11.00 x 5.62
Write Your Own Review
The following parts are replaced by this product
- JGA8150ADB
1. Unplug the power from your Whirlpool Range. This must be done prior to any repair work to prevent potential hazards.
2. Remove the existing JGA8150ADBA Whirlpool Burner Module Cartridge. Depending on your model, you may be able to slide/release the cartridge or unscrew it with a screwdriver. If there are screws, make sure to save and organize them in a safe place.
3. Clean the burner area of any debris or dirt that may have accumulated over time. This will ensure your new cartridge is secure and will not experience any difficulties functioning.
4. Install the new JGA8150ADBA Whirlpool Burner Module Cartridge. Make sure that it fits securely and evenly into the space without any gaps or bumps. Secure it with any screws as originally if applicable.
5. Plug in the power to your Whirlpool Range and turn it, as well as the burner, on. Confirm all functions are working properly.
6. Enjoy your new JGA8150ADBA Whirlpool Burner Module Cartridge, and bask in the glow of a successful DIY project!
Please keep in mind, these instructions are for general guidance and should always be used in conjunction with the manufacturer's manual, if available.
No more associated models for this part.


